012: Another Step Back...

One day I really hope to own an awesome belt grinder but, until that day, I’m using files, a jig, and a shed-load of elbow grease. The jig I have made is 100% inspired by the fantastic work and knowledge sharing of Aaron Gough (Gough Custom Knives). I take no credit for the basic concept of the jig albeit I have worked my own variation on the Gough jig.

The principle is that I start grinding with the file rod positioned in the top file guide hole and file until I reach just off the blade centre line; once reached I move down a hole and repeat. As I progress down the file guide holes the bevel angle becomes shallower and the primary bevel pushes up towards the spine.

011: One Step Back...

Having now found a pile of photos from the earliest stages of this venture, I want to take a little step back in time to pick up on something a bit fundamental - grinding bevels. There’s piles of good info available on different bevel types, their purpose, pros and cons etc. It seems to me that there’s a lot of good, rational reasons as to why some bevel profiles are better for some purposes, poorer for others and so on. It also seems that there’s a high degree of subjectivity and personal preference - perhaps any sensible profile, well sharpened, is capable of cutting stuff so, the question is really about best matching blade / bevel profile, size, blade thickness, blade steel to your intended purpose.

So, for now, this is what I’m looking at as a basic bevel:

20190120_162413_resized.jpg

This is a compound, or double, bevel meaning that the blade angle changes twice on each side going from the flat to the primary bevel to the secondary bevel. The secondary (or micro) bevel provides the cutting edge.

This grind profile might be called ‘Scandinavian’ or ‘Sabre’ depending on how close to the spine the primary bevel reaches. It is not a ‘Zero’ as it has a secondary bevel; for example a ‘Scandi-Zero’ grind would continue the primary bevel in to the cutting edge.

010: The 5 or 6 P's...

Proper Preparation Prevents (P…) Poor Performance - yes, common sense perhaps and yes, I have known this to be true for some time but I can still get caught out. This time the preparation came at the end of a garage session (postparation…?!) when I rushed tidying my work away as I assumed I would get back to it the next day. I didn’t and this happened….

In the winter my garage is cold and can be a bit damp. After every session I normally wrap my work piece in an oily rag for corrosion protection - not this time though. This is 5 mm 01 tool steel so shaping this blank took a lot of elbow grease. The blank had sat in contact with something that hastened / worsened the corrosion - the photos show the cleaned up version. Suffice it to say that this is one lesson that I feel I have now learned.

009: Such a square...!

I may not get this quote exactly but; “Nobody knew square holes could be so complicated…!”.

The challenge I have is drilling holes that are sufficiently square with no pillar drill. I’m opting for pins to attach handle scales (hoping to progress to Corby / Loveless bolts in due course) and I also like the aesthetic of a lanyard tube. Less relevant to the square hole point, but I’m skeletonising the tangs a bit too.

My drill is a decent 18v cordless so it has sufficient power but on my first few test runs it was apparent the drilled holes through the tang and scales were not straight / square enough to avoid difficult fitting that needed excessive force initially and/or when clamping at the gluing stage.

After a lot of internet trawling I found a basic drill stand that could be used with a cordless drill. The typical lever-handled, aftermarket drill stands that I had in mind will only work with corded drills due to the collar attachment. I also found a metric block-type drill guide.

This set-up is a big improvement albeit there is a lot of faffing about. I start the holes off with a centre punch but as I’m using standard length drill bits there is still some chatter that is amplified through the not fully solid / play-free drill stand. The next step will be to start drilling with a spotting drill and perhaps find shorter stub bits.

008: A-Team skills!!

As someone who grew up on a diet of The A-Team and MacGyver, I have long known that if you have a roll of gaffa tape and you can weld stuff then there's literally nothing you can't do. So, in all that time when I wasn't writing blog posts, I was putting in the time at evening classes to get a City & Guilds Level 1 in MIG Welding.

Success!!

Success!!

If you have done a Level 1 City & Guilds in welding, or any other trade skill I imagine, then you will know that the focus of the training is on getting the basics right. So, I can't you show you pictures of any tanks, flame-throwers, gun turrets or the like that would have made Hannibal, BA and the crew proud but, I can now weld straight joints of various types without frying, blinding or electrocuting myself...not bad!! I can also tell you that learning a new skill from a great teacher is an awesome thing and I found the whole experience very satisfying. 

I don't like selfies...!

I don't like selfies...!

007: Where does time go?!?

To say 'it's been a while' would be something of an understatement...! I am amazed to see that over a year has flown by since I last posted something. Part of me wishes I could alter the dates to show a constant stream of posts over the intervening weeks and months, part of me has a new found respect for all the people out there who can keep delivering new content week after week but, the biggest part of me is just happy to be back! Whilst I have not kept my blog up to date, I have been grinding away on the making front so, I plan to be filling in some blanks and catching up on some posting over coming weeks. Onwards....!! 

006: It's getting hot in here...

A blade's heat treatment (the process and result of hardening, quenching and tempering the steel) has been described by far more experienced knife makers than me as being the soul of the knife. The purpose of heat treating is to imbue the blade with just the right balance of hardness and strength so that it can take and keep an edge and function properly as a cutting tool. Prior to heat treatment the steel is simply too soft to be effective.

The stock removal process to shape a blade blank is, I guess, a largely mechanical process; that is not to say that it is easy - it isn't (or not yet anyway...!) but, it can all be seen with the safety-goggled eye and mistakes are immediately obvious. On the other hand, the important parts of heat treating take place at a molecular level to affect the physical and chemical state of the steel. at its most basic the process sees the steel 1) being heated to a very high temperature; 2) being cooled; and then 3) being re-heated to a more moderate temperature for a longer period.

With the basic principles in mind the challenge is, therefore, to work how the hell I can do this stuff...the answer, or at least part of it, is to make my own forge. As with many great projects this started with You Tube. I will use the 'Community' page on my site to recognise and thank those people who give their time and effort to share their skills and experience on You Tube - I have found this invaluable.

The basic forge design I have used is based around a gas blow torch and a chamber built with fire bricks.

The metal casing is aluminium held together only by the compression given by the steel studding. This is all that holds the fire bricks in place too as I wanted the forge to be fully maintainable in the event that any of the fire bricks broke. I drilled the main chamber with a hole saw. It has a drilled inlet in the site to fit the gas torch and it has a small vent at the rear.

My first attempt at using the forge was a failure on two fronts; first, it was the middle of winter, the gas bottle kept freezing, the torch sputtered a lot and it was difficult to maintain the heat; second, I didn't get the blade hot enough for long enough to full harden it - the lesson, don't bother trying to heat treat in a garage with no heating when it's sub-zero outside! However, I think the forge design is basically good and I have subsequently used it with success!

005: Tools: Round 2...Die Grinder!!

I work in a garage that has no electricity so everything that needs electricity currently has to use battery power - my lights, my power tools, my music...! I have been lucky enough to gather together a few Makita power tools - it seems to make sense to stick to one brand and platform when it comes to power tools so I'm on Makita LXT and I have several batteries meaning that I can buy 'body only' tools.

I have; a couple of LED work lamps; a combi-drill; a jig saw; an angle grinder; and...a die grinder. Whilst all are very useful and are regularly used, I have been most surprised and pleased at just how much the die grinder can do. I use a set of rotary burrs and a set of grinding stones.

The rotary burrs have proven to be great for rough shaping and partially skeletonising the blade blanks - I then use the stones for smoothing things off a bit. A word of caution...the die grinder with rotary burrs is a pretty aggressive tool capable of removing a lot of steel and biting chunks out if you don't keep a very firm grip and steady hand on it. Suffice it to say that glasses / goggles and a face shield are a must.

004 - Tools: Round 1...

At the outset I had a pretty standard random collection of DIY / bike repair / basic carpentry type tools collected over the last two or three decades and a Makita LXT cordless combi drill.

The knife making method that I'm getting to grips with is stock removal (rather than forging) so, in order to get anywhere at all I needed to begin with a decent hacksaw, some files and a stack of sandpaper. I already had a few of these tools but they were not really the right size, quality or condition so I hunted down tool bargains where I could trying to stay on the right side of the fine line between price and quality.

So, at the top of the shopping list was; a 12" hacksaw; a 12" flat bastard file; a 12" flat second cut file; a 12" flat smooth file; and some new drill bits. For the saw and files I went for Bahco tools as they seemed to offer good price / quality. There are loads of other options out there but I reckon there's a strong aspect to tool buying that is just personal preference, experience and sentiment as much as anything - I've had a Bahco adjustable spanner and socket set for years and both have been faultless. I also like the colour orange!

The theory goes that you can make a knife using pretty much only the tools I've just mentioned - I believe this is true but my experience is that it is very labour intensive!

Paper template to wood template to first basic blade blank cut with only a hacksaw and three files - it took a while!

Paper template to wood template to first basic blade blank cut with only a hacksaw and three files - it took a while!


003 - Materials: Blade steel

Over time I have built a modest collection of knives both folders and fixed blades. These cover blade steels such as; 440-C; 14C28N; 1095; CPM154; CPM3V; CPMS35VN; N695; N690; D2; and VG10. I'm no metallurgist so I have no intention of getting in to the fine details of composition variations (yet!) but clearly each of these steels has pros and cons in practical application and performance. That said, I think they all perform really well and are all more than capable of forming blades that can do everything a blade should without getting in to the realms of destructive testing and misuse.

However...at this very early stage in my venture in to knife making each of these steels has a fundamental issue in so far as they each require a level of precision in their working, heat treatment and tempering that I am not yet able to deliver not least in terms of not having appropriate processing equipment. Being based in the UK, my research led me to conclude that the only practical option for getting started was to use the tried and tested classic - 01 tool steel.

I have found that 01 ground flat stock is pretty easy to get hold of. Whilst it is perhaps not prohibitively expensive to buy, it is costly enough that I don't want to waste it! This means putting thought in to blade dimensions before buying steel so that I can buy stock in sizes that minimises wastage. In terms of thickness, 3mm currently feels like the optimum for smaller blades in terms of roughing out blanks and heat treating. I think 3mm stock also gives a reasonable balance for strength and slicing ability in smaller knives. I am in the process of making a larger camp knife in 5mm stock but, that is taking some serious elbow grease!

002 - Getting started

Square 1...no workshop, no knife making tools, no materials, no experience and not much money - perfect! But, I do have a garage...with no electricity...!

Having reorganised and tidied the garage to give me a corner that could become a workshop of sorts, I then set to building a work bench. Big enough to work on, small enough to fit my garage corner, tall enough not to give me back ache and strong enough to take a beating - how's that for a design brief...?! Finding the cheapest timber I could, this is what I've produced:

Work bench mk1 structurally complete!

Work bench mk1 structurally complete!

Sanded and double under-coated...

Sanded and double under-coated...

...and triple-coated with leftover paint form the garage. Fire engine red...nice!

...and triple-coated with leftover paint form the garage. Fire engine red...nice!

Once all the paint had finally dried I added a replaceable plywood top. I was lucky enough to find a Sheffield made Record No.4 bench vice for a reasonable price that is also now firmly bolted on.

Two big lessons from the work bench build:

1) this knife making project was going to take some time; and

2) spirit levels and sloping ground do not square things make!

None the less, the bench is level, wobble free, solid as a rock and fully functional - not bad!!

001 - Begin at the beginning...

I have a long running interest in the great outdoors and the kit that helps me to enjoy it. Yes, I am in many ways a common or garden kit junkie but, understanding the kit, what works what doesn't, what I need and what I don't, the design, the history and the craftsmanship is for me an integral part of the enjoyment.

As many of us do, I face the ongoing time/money challenge that limits my exposure to wild places but, I can still dream and plan and tinker and research when day-to-day life permits. And always look forward to my next trip!

Over the years I have investigated owned and used various; tents; rucksacks; boots; tarps; sleeping bags; stoves; pots...you get the picture...! I've been through the process of amassing, minimising, reducing and lightening my kit (in some areas going too far one way and then back the other).

At some point through all of this I developed a particular interest in cutting tools (as if an interest in alcohol stoves or Dyneema rucksacks wasn't particular enough!). It was in cutting tools (knives, axes, saws) that I found a potential creative outlet and it is this that spawned this website. 

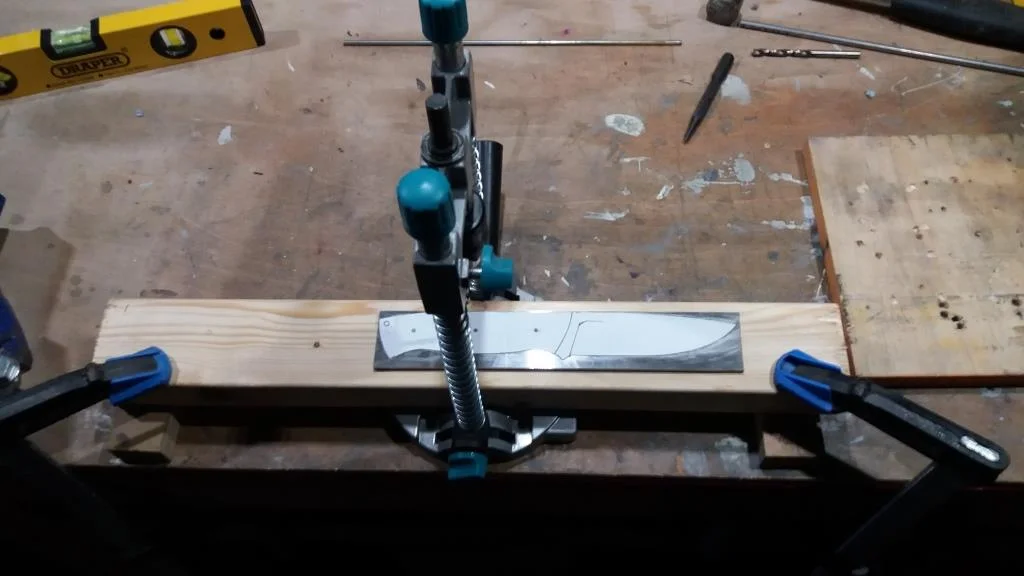
I have no particular background in IT, design, manual trades, manufacturing or arts and crafts but I have always been willing to try and turn my hand to things. This is the first website I have made, the first blog I have written, the first thing I have published and it all relates to my first steps in to the world of knife making. 

I hope I can share some useful information and experience about knife making as I move on from 'Day 1'. I also hope to share bits and pieces about other kit that I have picked up along the way and to give thanks and pay my respects to those of you out there who have gone before me and from whom I have learnt so much.